*Problem of existing tonearms
This tonearm is designed based on the basics and the principle of tonearm.
To pick up signal from groove correctly,the support of vibration system-cartridge
body,shell,arm including arm base- needs to be not moving at all relatively to
vibration system.
The existing tonearms with offset angle suffer unnecessary.
malposition in the support due to
1) inside force
2) down force
3) coresonance
*The merits of RS-A1 Structure
RS-A1 solved 3 problems using very unique arm structure.
It adoptted unique rotating shell (japanese patent) to solve the coresonane problem.
(1) There are 2 kinds of inside force.
The inside force caused by offset angle is serious problem.
To eliminate offset angle inside force,the arm structure needs to be purely
straight.
(2) To eliminate downforce, the arm structure needs to be purely straight vertically.too.
(3) Rotating shell separates the force to cartridge from the arm.
RS-A1 has other merits.
(1) It can get accurate stylus pressure
(2) No need to fix the arm base to turntable.
(3) The weight of the arm is very light and very quick to respond to the distorted
records etc.
*The Sound Quality of RS-A1
RS-A1 has
1) less intermodulation and better transient response.
2) stable sound stage and depth.
3) very low noise.
*How to use RS-A1
You need to follow below steps to assemble RS-A1
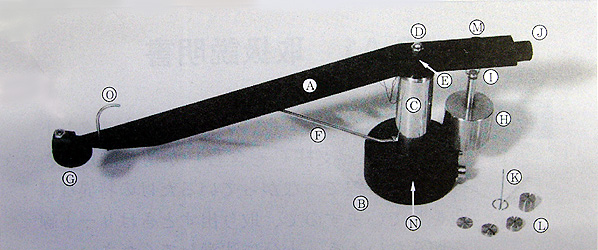
(1) Taking arm(A)&stand{(B)+(C)}out from box, put the stand on plane board like
desk.
Putting pivot(E)into pillow(D), make it sure that arm can be rested on arm
rest(F)
(2) Hook up cartridge to shell.
Taking arm off from stand, turn the arm upside down and hook up cartridge to
the shell.
Cartridge needs to be installed under the rotating axis of the subshell(G)
where the vibration point of cantilever comes. Usually front screw hole is the
right hook up point.
(3) Here are lead wire hook up.
L channel ------------(+) white (-) blue
R channel ------------(+) red (-) green
(4) After hooking up lead wires,follow step (1) and assemble the arm again.
(5) After making it sure that pivot is put into pillow correctly, hook
counterweight(H) down the ring(I)
(6) Putting subweight clamp (K)into the rear hole of weight adjusting screw(J),put
subweight(L) equal to the desirable stylus pressure into the clamp(K).
Next loosening the counterweight screw(M) and rotating screw(J), make the
arm in horizontal position.
Now you have got correct stylus pressure.
There are 4 kinds subweight,1.6g,0.8g,0.4g,0.2g
Combining there swbweight,you can choose upto 3g stylus pressure by 0.2g
step.
(7) Next is arm height adjustment.
Setting the stylus on the record on turntable,loosen the screw(N) on stand(C)
and fix the screw in the position where subshell gets horizontal.
(8) Confirm turntable is in horizontal position before setting arm.
Base can be put any where like below(position(A),(B)or(C)). No need to fix to the
turntable base.
Small difference in the arm base position does not make any big difference is the
sound quality.
(9) Put pincable into output terminal.
Left hand side is L channel.
Right hand side is R channel.
(10) Shell hook(0)can be set in any direction you like by loosening the screw of arm
back.